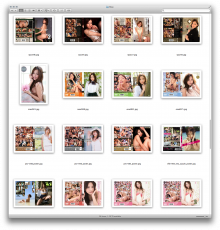
It's the question that plagues us all: how do I make my awesome JAV collection LOOK awesome? I've seen this issue discussed many times on Akiba-Online, and people have different ways of dealing with it. Some use 3rd party software to create a library and access their movies that way. I found this is be kinda annoying, so I went with the "folder.jpg" method (take an image of the front cover and name it "folder.jpg" to replace the live contents view of the folder to just show this cover art), but this isn't perfect. The cover icon is not only visible (and often covers part of the image) but the image is small (even at the largest view setting) and angled. This results in a collection that looks like this:

This is OK, but what if it could look even better? What if it could look more like this:

Much more awesome! There's no folder icon, the images are big and they're not angled! How did I do it? With the magic of icons! Here's what you'll need:
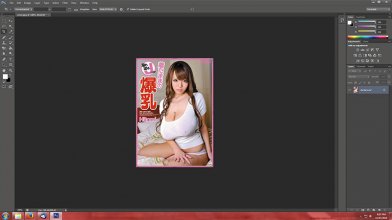
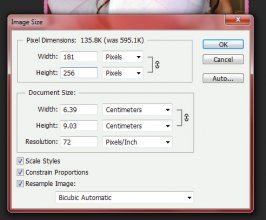
2) Go to image>image size. Resize the image so the biggest size (in the case of DVD covers, it's usually the height) is 256 pixels. Remember to check the "constrain properties" box to prevent the cover from getting distorted!
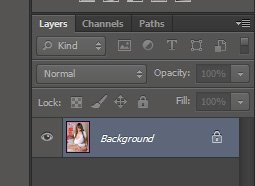
3) If your image is on a locked layer (i.e it has a little padlock icon) like in the below image, double click this layer and press enter and unlock it. Failing to do this will result in black border on the icon instead of being transparent!
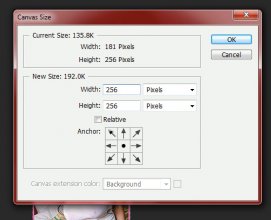
4) Go to image>canvas size and set the remaining figure to 256 pixels. Both boxes should now read "256". It's important that the image is exactly 256x256, it won't be able to be saved otherwise!
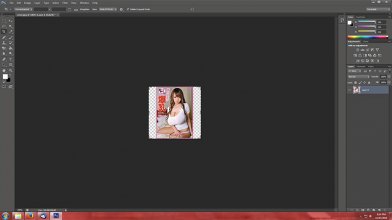
5) You should now have version of the cover with transparent "letterboxing" that measures exactly 256x256 like this:
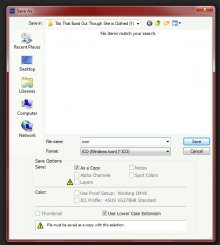
6) Now you just need to save the image as an .ico! Go to file>save. Change the format to "ICO", give the icon a name and click "save" (make sure you save the .ico into the video's folder!). On the window that pops up, choose the "PNG" option.
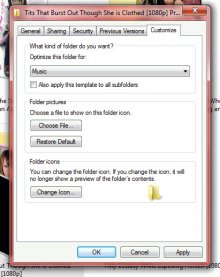
7) Now you just need to assign the icon to the folder! Right click the folder you want to customize and choose "properties". On this window, click the "customize" tab then click "change icon"
8) Click the "browse" button and navigate to the folder you saved your .ico into. Once you have found it, click it then click the "open" button"

9) Click "OK" to confirm the icon then click "OK to confirm the customization. Press "F5" to refresh your view and you'll see your newly customized folder!

That's it! You can now go about doing the same to all your other videos! Enjoy!

This is OK, but what if it could look even better? What if it could look more like this:

Much more awesome! There's no folder icon, the images are big and they're not angled! How did I do it? With the magic of icons! Here's what you'll need:
- Adobe Photoshop with the ICO plugin installed (go to http://www.telegraphics.com.au/svn/i...st/README.html to download the plugin and well as for instructions on where to put the plugin to install it)
- The cover art for the video (use Google Image Search!). Try to use the largest, cleanest size you can for your source image. When shrunk down to icon size, it will be nice and crisp! Make good use of the "search by image" option in Google Image Search to try and find a larger version!
- To set your folder view to "extra large icons"

2) Go to image>image size. Resize the image so the biggest size (in the case of DVD covers, it's usually the height) is 256 pixels. Remember to check the "constrain properties" box to prevent the cover from getting distorted!

3) If your image is on a locked layer (i.e it has a little padlock icon) like in the below image, double click this layer and press enter and unlock it. Failing to do this will result in black border on the icon instead of being transparent!

4) Go to image>canvas size and set the remaining figure to 256 pixels. Both boxes should now read "256". It's important that the image is exactly 256x256, it won't be able to be saved otherwise!

5) You should now have version of the cover with transparent "letterboxing" that measures exactly 256x256 like this:

6) Now you just need to save the image as an .ico! Go to file>save. Change the format to "ICO", give the icon a name and click "save" (make sure you save the .ico into the video's folder!). On the window that pops up, choose the "PNG" option.

7) Now you just need to assign the icon to the folder! Right click the folder you want to customize and choose "properties". On this window, click the "customize" tab then click "change icon"

8) Click the "browse" button and navigate to the folder you saved your .ico into. Once you have found it, click it then click the "open" button"

9) Click "OK" to confirm the icon then click "OK to confirm the customization. Press "F5" to refresh your view and you'll see your newly customized folder!

That's it! You can now go about doing the same to all your other videos! Enjoy!


