Since whisper has spawned many tweaked versions since its introduction and that so many people keep asking questions on how to use it, I figured I'd make a thread dedicated to it.
If you have questions about how to use it or you want me to add something I forgot/don't know about, just let me(or anyone else following) know in this thread.
Just click on the spoiler tag to open or close a section.
A: Whisper is a machine learning driven audio transcription tool. Meaning you can use it to transcribe audio to text from many different languages and it also has integrated translation.
A: There's many different ways, depending on what computer hardware you have and your needs. Without going into too much details, here's a few popular options:
- You can use it from your browser using google hardware with google colab which is easy and only requires you to have an internet connection. Nothing gets executed on your own pc so there is no hardware requirement and no installation required.
There's many options and you can even create your own with the colab but the most popular people use here is: https://colab.research.google.com/github/ANonEntity/WhisperWithVAD/blob/main/WhisperWithVAD.ipynb (May have incompatibility issues) or
https://colab.research.google.com/g...AV/blob/main/notebook/WhisperWithVAD_mr.ipynb (Same but with incompatibility fixes)
https://colab.research.google.com/g...V/blob/main/notebook/WhisperWithVAD_pro.ipynb (Exposes a few more options to control whisper)
- You can use Subtitle Edit implementation of it which does most of the hard work of installing it for you. Just install subtitle edit, open a video in it and select the audio to text option. It does require you to meet the hardware requirement for it since you will run whisper locally on your pc.
- You can install whisper or any of its variants by installing it on your pc but that will often mean messing around with installing stuff from the command line and you also need to meet the hardware requirement for it since you will run it locally on your pc.
A: It depends on the version you're using.
- If you use the colab, all you need is a browser and an internet connection to upload the files.
- If you have it installed locally, it will depends on your specific version but for original whisper, if you don't want it to take days using your cpu only, you need a GPU with cuda support and some AI cores(Nvidia RTX is a safe bet, some older ones might support it but will be slow as hell) and you need a certain amount of VRAM(GPU memory) depending on the model you want to use. If you have 10GB, you're good for any but if less, look at the following table or use a more memory optimized version.
A: From many places, most of which are github project pages(look for the text "Releases" on the middle right for a download link if there is an installer for it). There's probably hundreds of them but here's a few options:
- A popular google colab page for whisper with VAD by ANonEntity(online version): https://colab.research.google.com/github/ANonEntity/WhisperWithVAD/blob/main/WhisperWithVAD.ipynb (May have incompatibility issues) or
https://colab.research.google.com/g...AV/blob/main/notebook/WhisperWithVAD_mr.ipynb (Same but with incompatibility fixes by mei2)
- The original project page in python: https://github.com/openai/whisper
- Subtitle Edit project having it as a plugin in the Video->Audio to text (Whisper)... menu: https://github.com/SubtitleEdit/subtitleedit/releases/
- Whisper.cpp, a c++ port with a lower RAM requirement(4GB for large): https://github.com/ggerganov/whisper.cpp
A: The main 4 things you need to give whisper are: your audio source, that audio language, the AI model to use and if you want whisper to translate for you or not.
- Audio source: Whisper internally uses ffmpeg so anything that can handle(which is almost everything) will work as the source, even a video file since it can extract the audio from it automatically. If you're using the online version, you'll cave a lot of bandwidth if you demux(extract) the audio from the video though. You can also convert the audio but unless you need to modify it(boosting the level so it can hear better for example), it's not recommended.
- Audio language: That'll be japanese for most here and is pretty self explanatory.
- AI model: this is the "model" option you need to give to whisper. The closer to large it is, the more accurate it will be(usually).
- Translation: Whisper can do the translation itself or it can return the subtitle in the original language and you can use any other translation service to translate it. As far as I am aware, it's not possible to get both unless you run the audio twice.
Even more installation and usage tutorials to come in this post.
If you have questions about how to use it or you want me to add something I forgot/don't know about, just let me(or anyone else following) know in this thread.
Just click on the spoiler tag to open or close a section.
FAQ
Q: What is whisper?
A: Whisper is a machine learning driven audio transcription tool. Meaning you can use it to transcribe audio to text from many different languages and it also has integrated translation.
Q: How do I use whisper?
A: There's many different ways, depending on what computer hardware you have and your needs. Without going into too much details, here's a few popular options:
- You can use it from your browser using google hardware with google colab which is easy and only requires you to have an internet connection. Nothing gets executed on your own pc so there is no hardware requirement and no installation required.
There's many options and you can even create your own with the colab but the most popular people use here is: https://colab.research.google.com/github/ANonEntity/WhisperWithVAD/blob/main/WhisperWithVAD.ipynb (May have incompatibility issues) or
https://colab.research.google.com/g...AV/blob/main/notebook/WhisperWithVAD_mr.ipynb (Same but with incompatibility fixes)
https://colab.research.google.com/g...V/blob/main/notebook/WhisperWithVAD_pro.ipynb (Exposes a few more options to control whisper)
- You can use Subtitle Edit implementation of it which does most of the hard work of installing it for you. Just install subtitle edit, open a video in it and select the audio to text option. It does require you to meet the hardware requirement for it since you will run whisper locally on your pc.
- You can install whisper or any of its variants by installing it on your pc but that will often mean messing around with installing stuff from the command line and you also need to meet the hardware requirement for it since you will run it locally on your pc.
Q: What do I need to run whisper?
A: It depends on the version you're using.
- If you use the colab, all you need is a browser and an internet connection to upload the files.
- If you have it installed locally, it will depends on your specific version but for original whisper, if you don't want it to take days using your cpu only, you need a GPU with cuda support and some AI cores(Nvidia RTX is a safe bet, some older ones might support it but will be slow as hell) and you need a certain amount of VRAM(GPU memory) depending on the model you want to use. If you have 10GB, you're good for any but if less, look at the following table or use a more memory optimized version.
Q: Where can I get whisper?
A: From many places, most of which are github project pages(look for the text "Releases" on the middle right for a download link if there is an installer for it). There's probably hundreds of them but here's a few options:
- A popular google colab page for whisper with VAD by ANonEntity(online version): https://colab.research.google.com/github/ANonEntity/WhisperWithVAD/blob/main/WhisperWithVAD.ipynb (May have incompatibility issues) or
https://colab.research.google.com/g...AV/blob/main/notebook/WhisperWithVAD_mr.ipynb (Same but with incompatibility fixes by mei2)
- The original project page in python: https://github.com/openai/whisper
- Subtitle Edit project having it as a plugin in the Video->Audio to text (Whisper)... menu: https://github.com/SubtitleEdit/subtitleedit/releases/
- Whisper.cpp, a c++ port with a lower RAM requirement(4GB for large): https://github.com/ggerganov/whisper.cpp
Q: How do I use whisper once I have it?
A: The main 4 things you need to give whisper are: your audio source, that audio language, the AI model to use and if you want whisper to translate for you or not.
- Audio source: Whisper internally uses ffmpeg so anything that can handle(which is almost everything) will work as the source, even a video file since it can extract the audio from it automatically. If you're using the online version, you'll cave a lot of bandwidth if you demux(extract) the audio from the video though. You can also convert the audio but unless you need to modify it(boosting the level so it can hear better for example), it's not recommended.
- Audio language: That'll be japanese for most here and is pretty self explanatory.
- AI model: this is the "model" option you need to give to whisper. The closer to large it is, the more accurate it will be(usually).
- Translation: Whisper can do the translation itself or it can return the subtitle in the original language and you can use any other translation service to translate it. As far as I am aware, it's not possible to get both unless you run the audio twice.
Extracting audio
If you want to upload or manipulate your video audio, you'll probably want to extract it from the video first and there are many ways to do it but I'll explain a few.
You'll want to avoid converting the audio if your goal is to extract it so you need to be aware of what the program you use actually does if you get a random one. Converting will incur a small loss in quality and can possibly make the audio harder to understand for whisper, but in practice, it doesn't seem to change much so no need to be paranoid either, even if I say you shouldn't.
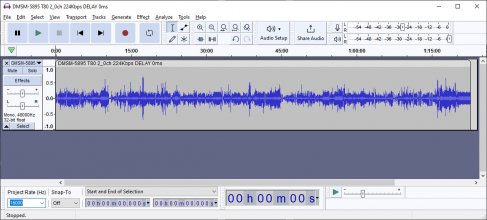
For mono: In the top menu: "Tracks->Mix->Mix Stereo down to Mono".
For 16k sample rate: Bottom left of the interface, change "Project Rate (Hz)" to 16000.
To export as wav: In the top menu: "File->Export->Export as WAV", Choose where to save the file and leave the Encoding to "Signed 16-bit PCM" and Save as type to "WAV (Microsoft)". No need to worry about metadata either so just press ok if you see the Edit Metadata Tags window.
If you want to convert it directly to lossless without editing or having to worry about different demuxing softwares, you can use ffmpeg from the command line to do it with the following command:
"ffmpeg.exe" should be the full path to your ffmpeg.exe if it's not in the current folder or your windows user environment variables, the quotes are necessary if there's a space anywhere in that path.
"input.mp4" should be the full path and filename of your input video file.
"output.wav" should be the full path(if you don't want it in the current folder) and filename of your output file.
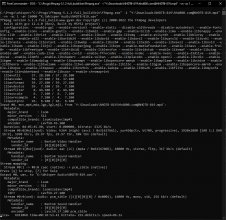
Here's an actual example on how to use it:
An easy software to use for that is mkvtoolnix. Once installed, you just drag and drop(or open by right-clicking and selecting "Add files") your video file in the "Source Files:" box in the input sub tab and the multiplexer main tab(which is what opens by default), deselect all but the audio track in the "Tracks, chapters and tags:" box, change the "Destination file" if you want and press start multiplexing(at the middle bottom) to save the audio.
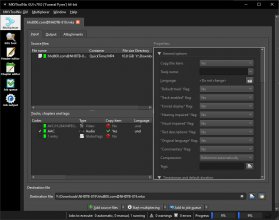
Your raw audio will be inside an audio only container(mka in this case) and you can use that to whisper with no quality loss.
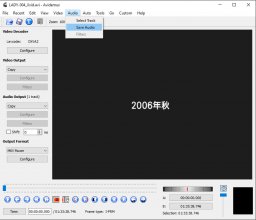
- AVI: With Avidemux(it supports more than just avi too, but I prefer other options for other containers), you open your video with the menu "File->Open...", make sure the "Audio Output" is set to "Copy" on the left, save the audio track with the menu "Audio->Save Audio" and select your destination in the save dialog. The correct type will get selected automatically.
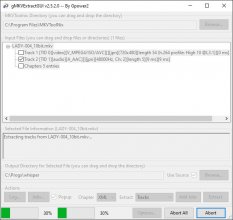
- MKV: With Mkvtoolnix installed, you can use a separate GUI(there are suggestions in the mkvtoolnix installer, I use gMKVExtractGUI) to extract raw audio from an mkv(only) container.
Drag and drop an mkv video(or open it by right-clicking and selecting "Add Input file(s)...") in the "Input Files" box, select the audio track, change the output Directory(or check "Use Source" to save it in the source folder) and press the "Extract" button on the bottom right to save the audio.
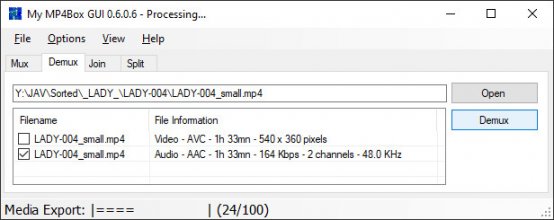
- MP4: With GPAC Mp4Box and a GUI for it(which most are no longer developed so you can run into issues, I use My MP4Box GUI. It is optional but fairly complicated to use in command line mode) to extract audio from mp4(only) containers.
Go in the "Demux" tab, Drag and drop your mp4 video(or press "Open" and select it), select the audio track and press "Demux" to save it to the same folder as the video.
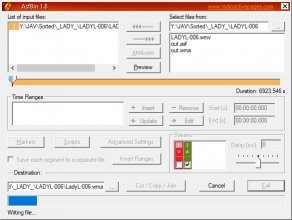
- WMV: With AsfBin(Asf is the older version of Wmv and are usually compatible with each other), select the folder with your wmv file by clicking the "..." button on the top right, then select the wmv file in the "Select files from:" box, press "<<<===:" to move it to the "List of input files:" box, unckeck the video track in "Streams" on the bottom right portion, set the output file in "Destination:" at the bottom left, change the extension from "asf" to "wma" manually and press the "Cut / Copy / Join" button to save it.
- And the last option, you can also use ffmpeg in command line to demux audio from any container with the following command:
"ffmpeg" should be the full path to your ffmpeg.exe if it's not in the current folder or your windows user environment variables, the quotes are necessary if there's a space anywhere in that path.
"input.mp4" should be the full path and filename of your input video file.
"output.aac" should be the full path(if you don't want it in the current folder) and filename of your output file.
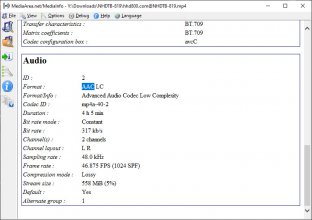
You do have to know what the proper file extension is your specific video audio, which you can find in many ways, one of which is mediainfo:
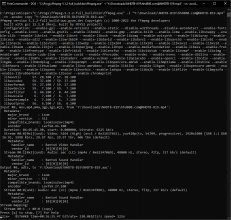
And here's an actual example with ffmpeg:
You'll want to avoid converting the audio if your goal is to extract it so you need to be aware of what the program you use actually does if you get a random one. Converting will incur a small loss in quality and can possibly make the audio harder to understand for whisper, but in practice, it doesn't seem to change much so no need to be paranoid either, even if I say you shouldn't.
Audio conversion:
You'll only want to use this option if you plan to modify the audio in some way. Audacity is a good free audio editing software. Do whatever you want to the audio and once you're done, you'll ideally want to export it as a wav with a 16k sample rate and mono channel. That is what whisper will convert any audio it receives internally so saving it as that format will ensure there is no quality loss since wav is a mathematically lossless format and reducing the sample rate and channel right away will keep the size at a manageable 256kbps.For mono: In the top menu: "Tracks->Mix->Mix Stereo down to Mono".
For 16k sample rate: Bottom left of the interface, change "Project Rate (Hz)" to 16000.
To export as wav: In the top menu: "File->Export->Export as WAV", Choose where to save the file and leave the Encoding to "Signed 16-bit PCM" and Save as type to "WAV (Microsoft)". No need to worry about metadata either so just press ok if you see the Edit Metadata Tags window.

If you want to convert it directly to lossless without editing or having to worry about different demuxing softwares, you can use ffmpeg from the command line to do it with the following command:
Code:
"ffmpeg.exe" -i "input.mp4" -vn -ac 1 -ar 16000 "output.wav""input.mp4" should be the full path and filename of your input video file.
"output.wav" should be the full path(if you don't want it in the current folder) and filename of your output file.
Here's an actual example on how to use it:

Remuxing to an audio only container
: One of the easiest option if you don't want to have to worry about what container(mkv, mp4, wmv, etc.) your video is in.An easy software to use for that is mkvtoolnix. Once installed, you just drag and drop(or open by right-clicking and selecting "Add files") your video file in the "Source Files:" box in the input sub tab and the multiplexer main tab(which is what opens by default), deselect all but the audio track in the "Tracks, chapters and tags:" box, change the "Destination file" if you want and press start multiplexing(at the middle bottom) to save the audio.

Your raw audio will be inside an audio only container(mka in this case) and you can use that to whisper with no quality loss.
Demuxing raw audio
: If you need/want the actual raw audio file(if you want to load it in an audio software that doesn't support loading videos or for whatever reason), you'll need to demux it using a container specific software. There's multiple options but I'll only mention the easy ones I use.- AVI: With Avidemux(it supports more than just avi too, but I prefer other options for other containers), you open your video with the menu "File->Open...", make sure the "Audio Output" is set to "Copy" on the left, save the audio track with the menu "Audio->Save Audio" and select your destination in the save dialog. The correct type will get selected automatically.

- MKV: With Mkvtoolnix installed, you can use a separate GUI(there are suggestions in the mkvtoolnix installer, I use gMKVExtractGUI) to extract raw audio from an mkv(only) container.
Drag and drop an mkv video(or open it by right-clicking and selecting "Add Input file(s)...") in the "Input Files" box, select the audio track, change the output Directory(or check "Use Source" to save it in the source folder) and press the "Extract" button on the bottom right to save the audio.

- MP4: With GPAC Mp4Box and a GUI for it(which most are no longer developed so you can run into issues, I use My MP4Box GUI. It is optional but fairly complicated to use in command line mode) to extract audio from mp4(only) containers.
Go in the "Demux" tab, Drag and drop your mp4 video(or press "Open" and select it), select the audio track and press "Demux" to save it to the same folder as the video.

- WMV: With AsfBin(Asf is the older version of Wmv and are usually compatible with each other), select the folder with your wmv file by clicking the "..." button on the top right, then select the wmv file in the "Select files from:" box, press "<<<===:" to move it to the "List of input files:" box, unckeck the video track in "Streams" on the bottom right portion, set the output file in "Destination:" at the bottom left, change the extension from "asf" to "wma" manually and press the "Cut / Copy / Join" button to save it.

- And the last option, you can also use ffmpeg in command line to demux audio from any container with the following command:
Code:
"ffmpeg.exe" -i "input.mp4" -vn -acodec copy "output.aac""input.mp4" should be the full path and filename of your input video file.
"output.aac" should be the full path(if you don't want it in the current folder) and filename of your output file.
You do have to know what the proper file extension is your specific video audio, which you can find in many ways, one of which is mediainfo:

And here's an actual example with ffmpeg:

Using the google colab with whisper + Silero VAD
This is by far the easiest option to use and what most people will want since it doesn't require to have any specific hardware. It works with the colab website accessing remote computers and running all the code mentioned in that page completely on there, nothing is done on your pc. But the downside is that it can only be used a limited amount of times per day(there are ways around those limitations but they are in place for a good reason so please don't abuse the system so that everybody has a fair chance to use it).
First, open the colab website in your browser: https://colab.research.google.com/github/ANonEntity/WhisperWithVAD/blob/main/WhisperWithVAD.ipynb (May have incompatibility issues) or
https://colab.research.google.com/g...AV/blob/main/notebook/WhisperWithVAD_mr.ipynb (Same but with incompatibility fixes)
https://colab.research.google.com/g...V/blob/main/notebook/WhisperWithVAD_pro.ipynb (Exposes a few more options to control whisper)
Then sign in with a google account on the top right:

Next press the play icon to run the "GPU check" step to make sure you're connected to a session with a GPU(whisper will be MUCH faster with one than using the CPU only).
Press "Run Anyway" for the warning about the notebook not being authored by Google, that simply means a user created the code.
You should see this after running it:
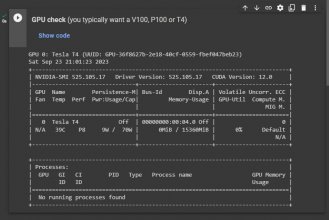
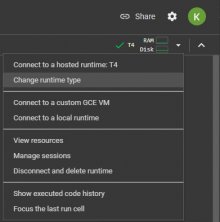
This pretty much always work and isn't really necessary, but if you see 2 nvidia command failing to execute instead, go to the top right where it says RAM and Disk, press the down arrow icon and select "Change runtime type" to manually select one of the 3 GPU type(be warned that this will reset the session and delete every file you uploaded or generated if any):
Before you do anything else, you have to decide if you're going to use your own google drive to upload the audio(see Extracting audio section above or waste your bandwidth/time uploading the full video), which gives the code on that page complete access to every files on your drive, or if you'll upload the audio directly to the session(which will get deleted as soon as you refresh or disconnect the sessions, so in case of problems, you may have to upload the audio more than once).
- Google Drive:
- Session upload:
Now install whisper on the colab hardware and update packages as necessary by pressing the play icon on the left of "Setup Whisper" and wait until it says "Done" at the bottom:
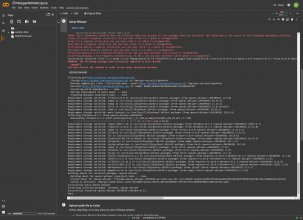
As long as you see the following 2 lines at the bottom(versions number may vary), don't worry too much about any errors in there, it should not matter:
Now we want to change the settings before running whisper. By default it'll set the language as "Japanese", the model as "large"(which means large_v2) and it will have whisper itself translate it to english as the default "translation_mode:" which is what most people will want and the rest of the options are stuff you can tweak once you know more about it or if you want to mess around or follow other people suggestions.
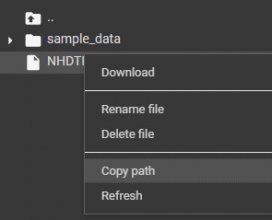
The only option you have to change is "audio_path:". Either manually type your filename there or click on the 3 vertical dots on the right of a file in the file browser:

Then select "Copy path":
And finally paste it as the "audio_path:" text:
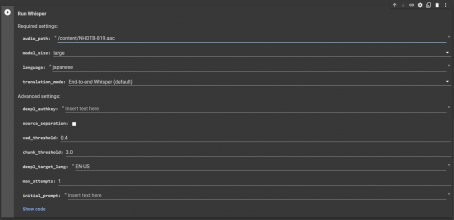
Now press the play icon on the left of "Run Whisper" and wait for the process to finish. It will encode the audio to a specific format for VAD to process(likely the same as the internal whisper one), download and install all the requirement for Silero VAD as well as the model you selected and then split and process the full audio separated in chunks by the VAD through whisper one by one.
The time it takes will vary a lot depending on the download speed and the length of your audio but for a 2 hour audio it usually take me an average of 30 minutes.
The red underlined last line in the screenshot tells you which chunk it's currently processing and has an estimation of the remaining time until all chunks are processed.
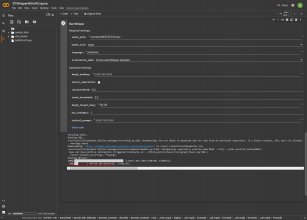
As long as you see the timer counting up next to "Executing: in the bottom status bar, it means things are working and something is in progress and there's nothing to worry about:

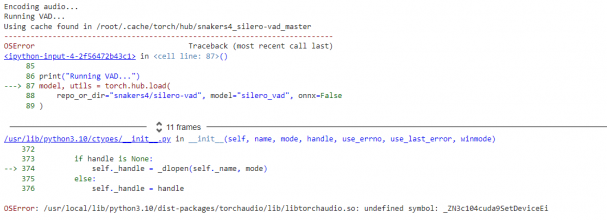
It will stop counting if there is an error and that error will show up in the log at the bottom of the page, which will be necessary to figure out what the problem is so copy that log and include it in your post if you plan on asking people how to fix a problem with it.
Once the process is complete, a save file dialog window will appear asking you to save the srt file somewhere and it will also appear in the file browser on the left, in case you accidentally cancel that without saving it first. Also, if you used the google drive option, it will get saved there instead of in the session(but still visible in the drive folder).
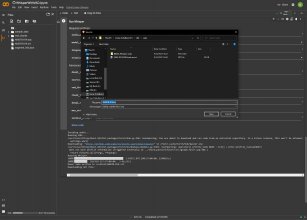
If you run multiple files in the same session, you only have to repeat the "Run Whisper" step(you do have to upload another audio file and change the "audio_path:" option first, of course) but you have to be aware of the RAM and Disk usage on the top right(the tiny little graphs on the right there, click or hover on them for more details) since it doesn't get freed up so if you run whisper too much(more than twice) it will likely crash and reset the session. If you see it being almost full, just restart a new session first if you don't want to take a chance with it crashing, but do make sure to save all the files you want to keep first since they will be deleted from the session file browser.
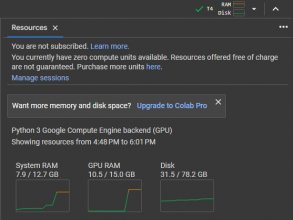
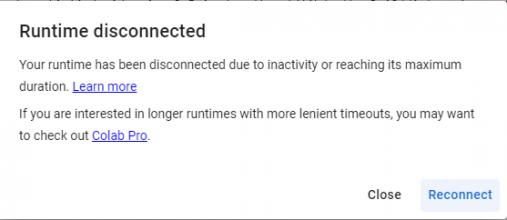
If you leave the colab session running without using the GPU for a certain amount of time, you'll see a little popup on the bottom left asking if you want to switch to a cpu only session. If you do, you won't be able to use whisper without having to reset the session and therefore losing all of your session files so simply press the x to close it unless you're done. If you stay idle on the page, it reserves a gpu for you and others can't use it so it's better to not be greedy and avoid idling. It is unavoidable at the beginning if you upload files directly to the session but you can upload a new file while whisper is running without problem so if you do more than one, do plan ahead and upload there or to your google drive before the first audio is done.

First, open the colab website in your browser: https://colab.research.google.com/github/ANonEntity/WhisperWithVAD/blob/main/WhisperWithVAD.ipynb (May have incompatibility issues) or
https://colab.research.google.com/g...AV/blob/main/notebook/WhisperWithVAD_mr.ipynb (Same but with incompatibility fixes)
https://colab.research.google.com/g...V/blob/main/notebook/WhisperWithVAD_pro.ipynb (Exposes a few more options to control whisper)
Then sign in with a google account on the top right:

Next press the play icon to run the "GPU check" step to make sure you're connected to a session with a GPU(whisper will be MUCH faster with one than using the CPU only).
Press "Run Anyway" for the warning about the notebook not being authored by Google, that simply means a user created the code.
You should see this after running it:

This pretty much always work and isn't really necessary, but if you see 2 nvidia command failing to execute instead, go to the top right where it says RAM and Disk, press the down arrow icon and select "Change runtime type" to manually select one of the 3 GPU type(be warned that this will reset the session and delete every file you uploaded or generated if any):

Before you do anything else, you have to decide if you're going to use your own google drive to upload the audio(see Extracting audio section above or waste your bandwidth/time uploading the full video), which gives the code on that page complete access to every files on your drive, or if you'll upload the audio directly to the session(which will get deleted as soon as you refresh or disconnect the sessions, so in case of problems, you may have to upload the audio more than once).
- Google Drive:
Connect to your google drive and drag and drop an audio file(or right-click and select "File upload" to choose one) to upload it:
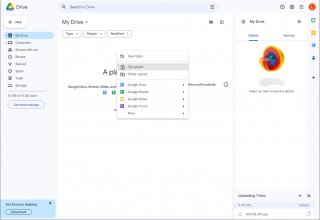
Once completed(Progress is on the bottom right), but ideally you do this before the previous step which connected you to a colab session, go back to the colab page.
Press the play icon left of "Mount Google Drive", and select the "Connect to google drive" option:
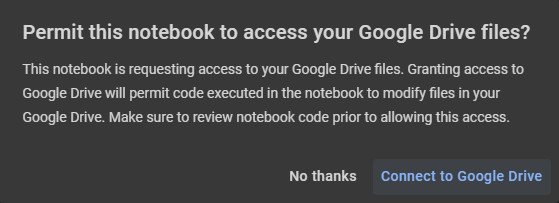
Choose your google account in the popup, read the scary list of all the permission you need to give the colab page so it can retrieve the files from there and select "Allow"(or use Session Upload instead if you don't want to agree to all of those) on the bottom right. The popup windows will close and you can return to the colab page.
Once you see "Mounted at drive", it is done.

Open the file browser on the left by clicking the folder icon:
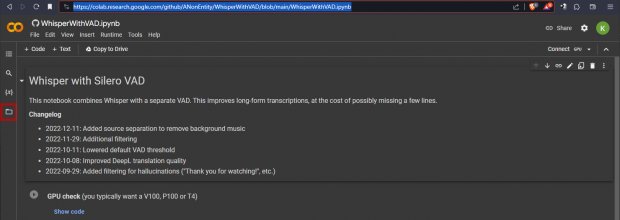
Click on "drive" and then "MyDrive" to access the files from your google drive.
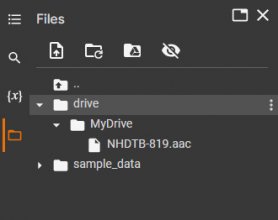

Once completed(Progress is on the bottom right), but ideally you do this before the previous step which connected you to a colab session, go back to the colab page.
Press the play icon left of "Mount Google Drive", and select the "Connect to google drive" option:

Choose your google account in the popup, read the scary list of all the permission you need to give the colab page so it can retrieve the files from there and select "Allow"(or use Session Upload instead if you don't want to agree to all of those) on the bottom right. The popup windows will close and you can return to the colab page.
Once you see "Mounted at drive", it is done.

Open the file browser on the left by clicking the folder icon:

Click on "drive" and then "MyDrive" to access the files from your google drive.

- Session upload:
Open the file browser on the left by clicking the folder icon:

Drag and drop an audio file(or right-click and select "Upload") in the file browser on the left:

Press ok for the warning that says your files will be deleted once the session is closed.
You can see the progress of the upload on the bottom left(it will disappear from there once fully uploaded):
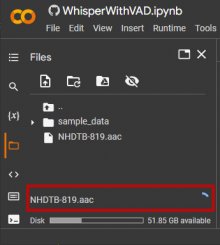
While it's uploading, you can do the next few steps, just not the "Run Whisper" one before it is complete.

Drag and drop an audio file(or right-click and select "Upload") in the file browser on the left:

Press ok for the warning that says your files will be deleted once the session is closed.
You can see the progress of the upload on the bottom left(it will disappear from there once fully uploaded):

While it's uploading, you can do the next few steps, just not the "Run Whisper" one before it is complete.
Now install whisper on the colab hardware and update packages as necessary by pressing the play icon on the left of "Setup Whisper" and wait until it says "Done" at the bottom:

As long as you see the following 2 lines at the bottom(versions number may vary), don't worry too much about any errors in there, it should not matter:
Code:
Successfully installed openai-whisper-20230918 tiktoken-0.3.3
Done
Now we want to change the settings before running whisper. By default it'll set the language as "Japanese", the model as "large"(which means large_v2) and it will have whisper itself translate it to english as the default "translation_mode:" which is what most people will want and the rest of the options are stuff you can tweak once you know more about it or if you want to mess around or follow other people suggestions.
The only option you have to change is "audio_path:". Either manually type your filename there or click on the 3 vertical dots on the right of a file in the file browser:

Then select "Copy path":

And finally paste it as the "audio_path:" text:

Now press the play icon on the left of "Run Whisper" and wait for the process to finish. It will encode the audio to a specific format for VAD to process(likely the same as the internal whisper one), download and install all the requirement for Silero VAD as well as the model you selected and then split and process the full audio separated in chunks by the VAD through whisper one by one.
The time it takes will vary a lot depending on the download speed and the length of your audio but for a 2 hour audio it usually take me an average of 30 minutes.
The red underlined last line in the screenshot tells you which chunk it's currently processing and has an estimation of the remaining time until all chunks are processed.

As long as you see the timer counting up next to "Executing: in the bottom status bar, it means things are working and something is in progress and there's nothing to worry about:

It will stop counting if there is an error and that error will show up in the log at the bottom of the page, which will be necessary to figure out what the problem is so copy that log and include it in your post if you plan on asking people how to fix a problem with it.
Once the process is complete, a save file dialog window will appear asking you to save the srt file somewhere and it will also appear in the file browser on the left, in case you accidentally cancel that without saving it first. Also, if you used the google drive option, it will get saved there instead of in the session(but still visible in the drive folder).

If you run multiple files in the same session, you only have to repeat the "Run Whisper" step(you do have to upload another audio file and change the "audio_path:" option first, of course) but you have to be aware of the RAM and Disk usage on the top right(the tiny little graphs on the right there, click or hover on them for more details) since it doesn't get freed up so if you run whisper too much(more than twice) it will likely crash and reset the session. If you see it being almost full, just restart a new session first if you don't want to take a chance with it crashing, but do make sure to save all the files you want to keep first since they will be deleted from the session file browser.

If you leave the colab session running without using the GPU for a certain amount of time, you'll see a little popup on the bottom left asking if you want to switch to a cpu only session. If you do, you won't be able to use whisper without having to reset the session and therefore losing all of your session files so simply press the x to close it unless you're done. If you stay idle on the page, it reserves a gpu for you and others can't use it so it's better to not be greedy and avoid idling. It is unavoidable at the beginning if you upload files directly to the session but you can upload a new file while whisper is running without problem so if you do more than one, do plan ahead and upload there or to your google drive before the first audio is done.

Installing and using Original whisper
To install the original whisper, you'll need to have python installed first as well as a few plugins for it.
You may not want to use the latest version of python since it is possible it can have incompatibilities with the whisper code. The latest version they recommend right now is 3.11 but if you don't mind running into potential issues, you can install the latest instead which will likely work too.
Download python(scroll down a little to get the previous versions download links and you probably want the recommended Windows installer (64-bit) version) and start the installer once the download is finished.
You'll want to check the "Add python.exe to PATH" option so that you don't have to type the full python path every time you want to use whisper and press "Install Now" to install it.
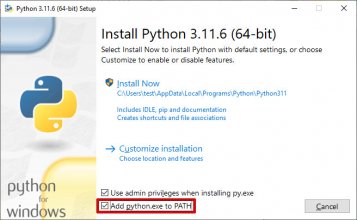
Allow the installer to make changes to your device by selecting "Yes" in the popup window and press close once the setup is successful.
Whisper requires pytorch to be installed to work and you need to install a version of it that matches your gpu capabilities. If you skip this step, whisper will only work with your cpu and it will be extremely slow(days for an hour of video).
To do so, go to the pytorch website and scroll down to the "INSTALL PYTORCH" section.
The default selected options are probably what you want to use(Stable, Windows, Pip, Python and CUDA 11) but you can try a more recent CUDA version if you feel adventurous.
Copy the content of the box on the right of "Run this Command:", open a command prompt by opening the start menu and typing "cmd"(or using the windows key + r shortcut and typing "cmd") and press enter to execute it and paste and execute the pytorch installation line.

If you run into issues when trying to install pytorch(or running whisper with your gpu), try uninstalling it first by running the following command and then try to install it again:
*** Do not execute this unless you have issues ***
Once the pytorch installation is complete(make sure there is no errors mentioned at the end), copy, paste and execute the following line to install whisper and all of its remaining dependencies:
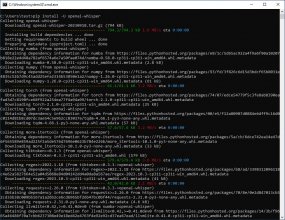
All that is left is to use whisper by running the command(or a python script but that's much more complicated and unnecessary) which looks something like this with most common options:

It will then display every lines it finds and then save the subtitle file in vtt, srt and txt in the current folder(your user folder by default which would be "C:\Users\Sloth" in this screenshot) once it is completed.
If you use "transcribe" as the task, it will likely only show squares in the command prompt since by default it uses a font that doesn't support Japanese but the resulting subtitle will be correct so no need to worry.
The larger the model you choose, the more accurate the transcription should be, but the higher the requirements are for your GPU VRAM and the longer it will take. You can see the available models and their GPU requirements on the official whisper github page for the project.
You can also see the available options as well as more advanced settings if you execute the command "whisper -h".
You may not want to use the latest version of python since it is possible it can have incompatibilities with the whisper code. The latest version they recommend right now is 3.11 but if you don't mind running into potential issues, you can install the latest instead which will likely work too.
Download python(scroll down a little to get the previous versions download links and you probably want the recommended Windows installer (64-bit) version) and start the installer once the download is finished.
You'll want to check the "Add python.exe to PATH" option so that you don't have to type the full python path every time you want to use whisper and press "Install Now" to install it.

Allow the installer to make changes to your device by selecting "Yes" in the popup window and press close once the setup is successful.
Whisper requires pytorch to be installed to work and you need to install a version of it that matches your gpu capabilities. If you skip this step, whisper will only work with your cpu and it will be extremely slow(days for an hour of video).
To do so, go to the pytorch website and scroll down to the "INSTALL PYTORCH" section.
The default selected options are probably what you want to use(Stable, Windows, Pip, Python and CUDA 11) but you can try a more recent CUDA version if you feel adventurous.
Copy the content of the box on the right of "Run this Command:", open a command prompt by opening the start menu and typing "cmd"(or using the windows key + r shortcut and typing "cmd") and press enter to execute it and paste and execute the pytorch installation line.

If you run into issues when trying to install pytorch(or running whisper with your gpu), try uninstalling it first by running the following command and then try to install it again:
*** Do not execute this unless you have issues ***
Code:
pip3 uninstall torch torchvision torchaudioOnce the pytorch installation is complete(make sure there is no errors mentioned at the end), copy, paste and execute the following line to install whisper and all of its remaining dependencies:
Code:
pip install -U openai-whisper
All that is left is to use whisper by running the command(or a python script but that's much more complicated and unnecessary) which looks something like this with most common options:
Code:
whisper --model large --language ja --task translate "full path to your audio or video file"
It will then display every lines it finds and then save the subtitle file in vtt, srt and txt in the current folder(your user folder by default which would be "C:\Users\Sloth" in this screenshot) once it is completed.
If you use "transcribe" as the task, it will likely only show squares in the command prompt since by default it uses a font that doesn't support Japanese but the resulting subtitle will be correct so no need to worry.
The larger the model you choose, the more accurate the transcription should be, but the higher the requirements are for your GPU VRAM and the longer it will take. You can see the available models and their GPU requirements on the official whisper github page for the project.
You can also see the available options as well as more advanced settings if you execute the command "whisper -h".
Last edited:


